Showing posts with label outcome. Show all posts
As this unit draws to a close I can honestly say I feel exhausted.


I have learnt a lot about my ability in this unit. I didn’t think I was going to be able to complete the workload at one point, but after a reality check I’ve learnt that I need to plan everyday out. This gives me optimum proficiency.  I felt as though this was a really research heavy unit more so than the hair or the digital image. I feel confident now in doing someone else’s design and this was something that I thought I was going to struggle with horrendously with. I’d like to become more confident in creating looks from mood boards alone and that is something I am going to challenge myself with next unit


I struggled at first working with a partner because I’m used to working alone. I enjoyed it though; it’s interesting to see how other people will carry out your design and vice versa. I was extraordinarily happy with my New Elizabethan design and I’m glad I kept a record of the designing process. I can’t wait to start again next semester. I will be making use of the tutorials more, so I know exactly what is expected from me in the beginning. I’m not going to be afraid to dive down the research rabbit hole when I find something that I can link to my topic; as I felt I played it very safe this time. I also won't be so shy in regards to showing my designs that I do in my own time. I’m my own worst critic and I’ll be looking to be more positive in the New Year


PRACTICE

TIME MANAGEMENT

SELF CONFIDENCE


This lady has been my biggest motivator and i'll be eternally grateful for all the wonderful advice she gave me to get through this unit. Thankfully, now that Sharon has taught me how to plan; I'll be less of mess next semester 


It's possible to fall into a false sense of security when you're being the model for your own design. It would be easy to think that there is no stress. How wrong was I? I'd practiced many parts of my own design a million times to make sure every single aspect of my design was easy to do. I tried to stay 'hands off' with Sophia when she was practicing, but I found it really difficult. I just had to explain lots. Explain the small little things I'd done to make individual elements easier to deliver.

I used a face mask the night before, and washed my face in tea tree oil face wash from
The Body Shop in the morning. It is my go to skin care product and I want to give Sophia the best canvas I can possibly muster.

I feel confident in her abilities and I was happy with the results I'd seen when we had practiced together. I just think she might have been a little nervous about using the face mask to make the dripping effect.

She sets up really nicely and her station looks really clean and organised. When we practised we both put out all of our kit and we both found that it made our stations get 100% messier and unorganised. I give her the products that I used so she could recreate the look.

I feel really confident in her abilities because I was really happy with how the results turned out when she practiced.

She spends a lot of time making sure the white base is perfect. I have to admire her patience for this. I would have struggled to achieve the same.

Thankfully Sophia remembered to use the card to get the really harsh line for the blusher that was needed. I'm feeling really happy with the results that are appearing. She puts on the eyeshadows and gets them to the same colour and darkness that we had achieved when we practiced and it seems to be going well so far. Her time management skills are great.

She whizzes through the mascara and very delicately puts on the lipstick how we had planned. Again, she nails it.

I can see her start to worry when it comes to doing the Neck Drippy Bit
™ She starts to mix it all up but forgets the white skin base. As she's mixing it all it's only by chance knocks the Skin base when she puts the bowl down. She instantly realises that she's forgotten it. I breathe a sigh of relief. She continues to mix up the paste testing the consistency by holding up the brush and seeing how well and easily it can drip.

She puts it all down my neck and using a brush to 'pull' down some 'veins'. I have to say overall I'm really happy with what she's managed to do.


The only thing I think she could have improved on was getting a sharper, more defined line along the jaw.

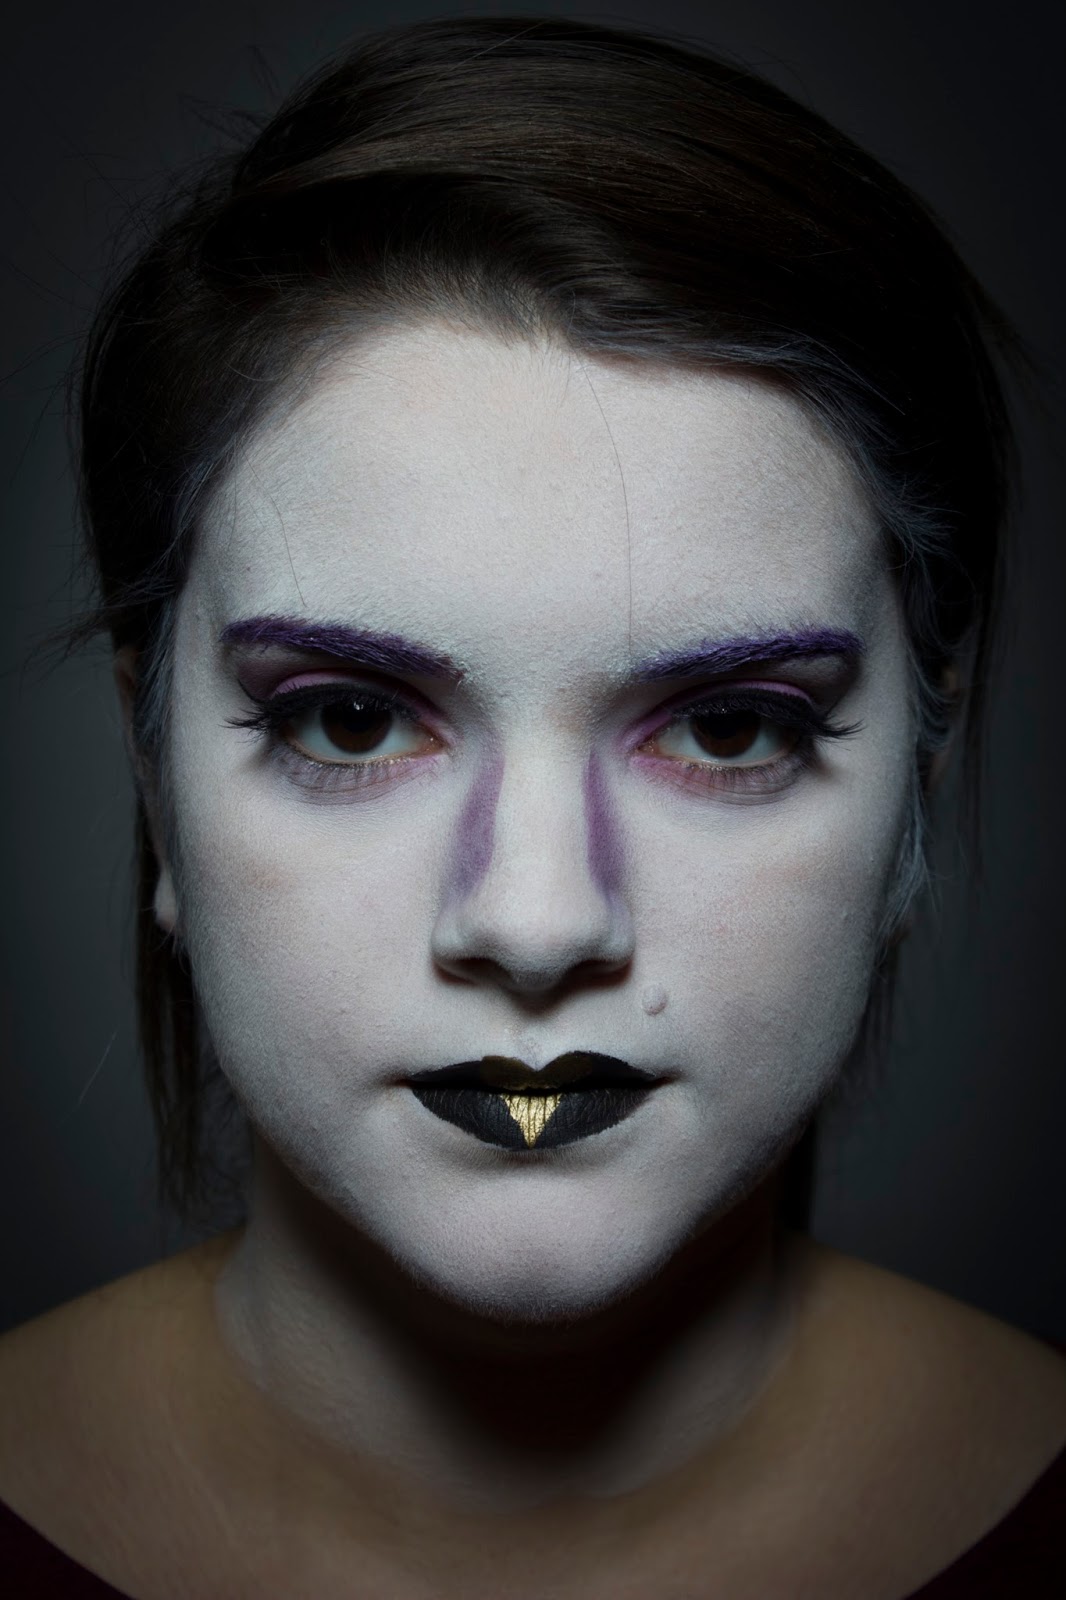
Blog post 1: Reflect on your TA performance and design. Discuss how you worked with another make-up artist design, what would you do differently, how the outcome reflect the design you were given?

It's been a rough week. I've had chronic toothache and the stress of my impending assessment has got me going all shades of crazy. I've really started to doubt everything I do and this makes me question how well I'm going to perform.

We had a practice session the night before my assessment and I felt fairly confident. I nailed the eyelashes and the winged liner, which were the two things that I thought were going to mess up her design.

When I got home, I cleaned my kit. I made sure it looked immaculate. A poorly kept kit reflects on you. So I sorted through the kit and made sure that I had everything that I needed. I double, triple and quadrupled checked the product list and stop OCDing over it and put it away for the night. I already had my clean black clothes ready and I began to try and get some shut eye.

BINGGG

Hardly any sleep and rush to get ready, I'm well on the way to my first assessment. I'm actually a little bit excited. I decided that coffee wasn't a good idea as it'll give me the shakes. I come into the class room calmly and zone out while I set up. I put my facechart up on the mirror, and my hand written notes. I'm so glad that I bothered to write some down. When I get l flustered I would probably forget something really easy and simple.

I put down the couch roll, set out all the brushes and cleanse, tone and moisturise Sophia. I take it slowly, so I don't rush and mess things up. From our practice sessions  I know that getting the base perfect is the most time consuming part, so I try my best to smash this. It's at this moment I know I need to invest in some sponges for my kit. I would think about beauty blenders but I'm not sure about the hygiene side of things.

I sail through the stages of the make up. My winged eyeliner went really well, the eyelash application went smooth. Even the heart on the lips went well.

Thinking on my feet, I used a matte white eyeshadow under the eyes because the foundation creased really badly. This worked a charm. When I finished the design Sophia seemed happy with it. So I guess that it was a good outcome.

What I've learnt from working with another make up artist:

- Communication is crucial. I felt like a lot of the time I felt like it was me that was making all the plans. I felt as though if I had left it to Sophia, we might not have met up to practice.
- It feels weird trying to showcase your skillset when you have a really simple design to do. I wish it would have been a little more complicated that would have proven a little bit more of a challenge.
- People will change their designs and not say anything about it. I noticed this with my partner. It wasn't a big deal, it just wasn't mentioned

What I'd do differently

- I'd probably organise my workstation in a better way. By the end of my session it looked Hurricane Nikki had swept through. It's so easy to get wrapped up in just picking things up and throwing them back down when you notice something that needs to be fixed immediately.

- I'd practice a white base application more. It's not easy. It's time consuming. It's important to be 100% happy with the base because as I learnt during my assessment, going back in to touch up a powdered white base is a very stupid idea as it makes it cakey. These kinda things are the incidents that make me want to pull out my hair and have a panic. Thankfully I didn't.

Here are some photos of my finished look :


So this is my self portrait. I've taken a lot of selfies but as soon as I have to put thought into one it became a challenge.  I had to think about what to put in it that symbolises me. As this is what I wanted my potrait to convey.

Obviously Batman had to be in there somewhere. I'm obsessed. I can't help it. I've been like since watching Batman Forever with my Daddy when I was younger. I'm actually a fan of the villains more than I am of Batman himself. Namely the Joker and Harley Quinn.

My note pad- I'm full of ideas. I like having lists and I enjoy writing things down. It's actually the notebook I use to take notes in my lectures and seminars. I get really precious about them. I normally by one when my life has gone wrong or unplanned and I use it to start a fresh.

Passport- It goes everywhere with me. I wish I could travel more and I hope that with my career choice I'll get there eventually.

Make-Up Artist Handbook- Clue is in the name for this one. Even if you were to take away the book title. I'm a bookworm. I love reading, I find solace in books. It means I can escape.

My Lipsticks- I have tonnes, they not might all be Mac, but to me that doesn't matter. It means I can create a million identities when I'm not feeling 100% comfortable in my own skin.

Scruffy (the dog) He was my first teddy and he comes everywhere. Being away from home has made me miss my dogs a lot more than I thought I would.

You can see a tiny corner of my messy room. Intentional. My life matches my room. Sometimes it's just chaos and other times it's slightly organised chaos.
Halloween is always my favourite holiday of the year. I'm known for going a little bit crazy with my make up as last year I was Harley Quinn. I wasn't going to go out but I decided last minute that I would. Having no costume meant my make up would have to be really cool.

After looking through my wardrobe I caught a glimpse of my tattoo in the mirror and decided I'd go as Sally from The Nightmare Before Christmas. I had a greyish blue dress that I could pull off as a model rag doll.

I started by using a Pritt Stick to block out my eyebrows, in all fairness I was really impressed with how well this worked. RuPaul's Drag Race has taught me something.


Mixing a tiny bit of a teal face paint in with my large white pan (Snazaroo) base I mix up a slightly off white colour and I apply this using my foundation brush. I cover my face, my neck, my ears (Sue would have been so proud) Across my chest and down my arms. When this had dried I had decided that the colour wasn't right for my look so I used a really watered down teal I kept building up the base. When I was finally happy with the colour I had noticed that my building up had given me great coverage as well as depth through all the very subtle shades I had created.

I used a creme white for the eyes. I needed staying power and the pigmentation was perfect for what I needed. I was going to make Sally's huge eyes over mine, hence covering the brows. I painted over my eyebrows and made two large circles.

Using a matte teal eyeshadow a few shades darker than the base. I applied this around the big white eyes to match Sally. This helped to add depth. I used the same colour to mark out where her stitches were going to be, as well as a contouring colour. My cheekbones looked incredible.

I stuck some Dolly Sleek Lashes on my forehead where they would on her eyes. She has really spindly lashes. I thought these matched up really well.


Using the white creme, I drew on all of the stitches. I went along with a cotton bud dipped in black facepaint and made the holes along the stitches. I 'dragged' the black from the dots into the stitches to give them some shading.

I whacked on some 'Blackmail' by Urban Decay.

I painted down my arms and added stitches at the joints, now for the tights, I made a teal mixture and left a pair of natural coloured tights in the sink soaking this liquid up. I dried them off and put them on.

I gave myself a center parting and sprayed it in place.

Et Voila.


 photo 12204214_10153277790306313_669674355_o 1_zpsbhorhc8h.jpg  photo 12203966_10153277789811313_466064364_o_zpslnuy1gku.jpg  photo 12194174_10153277794046313_611984454_o_zps1rfylcah.jpg  photo 12207420_10153277790021313_708932424_o_zpspai7eieo.jpg  photo 12204487_10153277790146313_163789131_o_zpsgrzeaw61.jpg
This was an exciting prospect. I enjoy working with colour and this looked like it was going to be a lot of fun. We had been given the task of designing a Sugar Skull face chart to be applied in class. I jumped at this opportunity because the whole concept of this festival as always entertained my curious side.


I'd cleared the desk in my room and I got out my notepad and trusty mechanical pencil and began to research this holiday. I had first heard of it on an episode of a TV show I would watch as a child, Lizzie Mcguire. It was during the Halloween special episode and her best friend was Mexican and wanted to celebrate it her way.


 The Research


 photo 12197235_10153266877356313_913348321_o_zpswpfbkl34.jpg  photo 12190580_10153266877311313_1407085359_o 1_zpscjhzt7r0.jpg  photo 12190307_10153266877371313_1947241763_o_zpsz9tiwycq.jpg  photo 12194411_10153266877331313_538314821_o 1_zpsbywkfq6e.jpg  photo 12185815_10153266877346313_35290965_o 1_zpsi3ymcbar.jpg


Reflection

At first I felt really confident with this design. I applied my illamasqua skin base in white mixed with moisturizer, I'd learnt from previous work with Billie that she has really dry skin.

I applied white supacolour ontop to smooth out the patchy parts 

Working with grease based problem was something I found rather difficult because I couldn't seem to get sharp lines.

I'm not overly happy with my line work.

I'd like to spend more time doing linework.

I'd probably change everything to facepaint or use normal make up products ontop of the base.

The girl next to me created an absolute masterpiece and made me feel pretty crappy about mine. I guess I've got to learn to not compare myself to everyone around me and instead try and learn from them.
Lipstick Application:

I've chosen to explain my favourite method of applying lipstick. You don't necessarily need to apply lipstick with an angled brush, I just prefer it because I think that the angled brush offers a more precise application

Tools:

  • Lip Primer
  • Lip Liner
  • Lipstick
  • Angled Lip Brush
  • Transluscent Powder
  • Tissue
  • Baby Buds

Method:


  1. Prep the lips. I find using a sugar scrub is great for really soft lips as it removes an excess dry skin.
  2. Apply the lip primer and allow time for this to sink in.
  3. With a freshly sharpened lip pencil, line the lips.
  4. Decanting the lip product needed, apply to the lips using an angled lip brush. I start on the cupid's bow and 'push' the product out with the brush turned on the side so it covers a larger surface area.
  5. Ask the model to rub their lips together
  6. Blot using a tissue
  7. Apply translucent powder
  8. Repeat steps 4-7 until you get the colour payoff you need.

Idea of university was daunting. It been an idea that I didn't think was going to happen and it terrified me. My alarm went off and there was no turning back. I was the first one up in my flat there's no one to say goodbye to, I was on my own.

I managed to meet up with some people that I already knew. We made our way up to a classrooms. University environment is something very different. I wasn't used to it. I was surrounded by people who wanted the exact same thing as I did and shared same passion I did.

One of my favourite lessons we had with an introduction to the course by older students. Really honest overview of our course and what to expect. That these people shared my same worries when I did make me feel at ease. Seeing some of the photos of their work throughout the year make me really look forward to about to embark on. I found their personal fears something I could relate to myself. Making many notes throughout this meet and greet, feel as though this is something I'll be able to look back to and use as a reference throughout my time here at Solent.

Another seminar that I enjoyed with with the Illamasqua team. I felt as though this was my first proper lecture, I love really excited about the talk they were about to give. The information received during this talk with priceless.  It covered vast areas within my chosen field. They spoke about how important the visual side is to our industry. Covering the relaunch of the Illamasqua website. We were told to make all of our personal social networking private because of how it effects our job opportunities which was something I had never considered.

Last event I am going to write about is the Illamasqua masterclass we attended. We were talked through the products that the Illamasqua 'staples'. I fell completely in love with their gel based products. The gel contour stick has honestly changed my life. The technique of using the heels of your hands to apply a contour product is completely ingenious. I took away so much from this workshop. One of the most helpful classes I have ever attended.

Overall, this week wasn't as bad as I thought it was going to be. The only thing I really struggled with was homesickness. It was the first time I've ever done something new and not gone home to my Daddy to tell him all about it. I cried a lot after my first day and if it wasn't for my flat I wouldn't have made it through this first week.

I love the fact I've made it here and I'm going to be studying something that I'm completely devoted to. The only thing I wasn't a massive fan of was the timetable. It was a bit intimidating at first but I'll work it out eventually. I think the workload maybe challenging if I don't keep on top of it as my weakness is time management.
Powered by Blogger.